 Skip to content
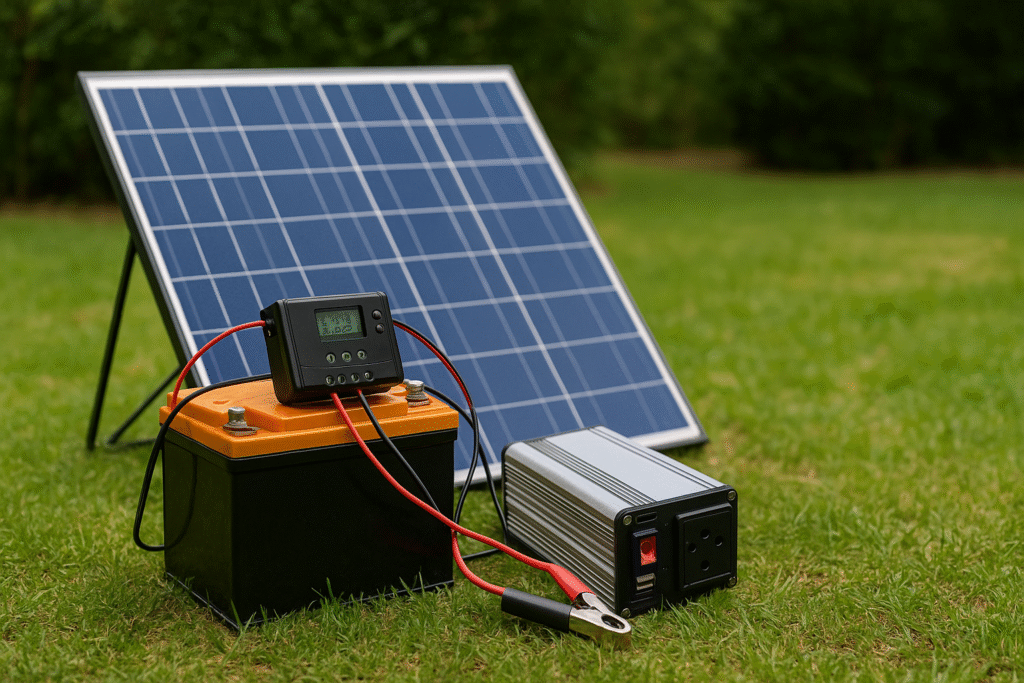
Imagine this…
The power suddenly goes out.
Your house goes quiet, too quiet.
The fridge stops humming, your food starts warming, and your phone is sitting at 5%, threatening to die right when you need it most.
You look around in the dim light and think, “Now what? How am I supposed to get through this?”
Now imagine the opposite…
Instead of panicking, you calmly walk over to a compact little power box you built with your own hands.
You plug in your phone, it instantly begins charging.
Your lights flick back on.
Your fan, router, or small appliances start running smoothly again.
Suddenly, you’re not helpless anymore, you’re in control.
That’s exactly what your DIY solar generator can do for you… and you can build it without being an electrician.
In this guide, I’ll walk you through everything step-by-step, in plain language, so you can build a reliable, safe, and affordable solar generator for camping, emergencies, RV life, or off-grid use.
Let’s get started.
What Is a Solar-Powered Generator? (Simple Explanation)
A solar generator is basically a smart box that:
- Collects sunlight → using solar panels
- Stores energy → inside a battery
- Converts it into usable power → through an inverter
- Lets you plug in your devices → using AC/DC/USB outlets
If you’re unsure how solar generators work, read this simple breakdown later:
How Does a Solar Powered Generator Work?
What You Need to Build a DIY Solar Generator
(Everything explained like you’re a complete beginner)
| Component | Why You Need It | Simple Explanation |
| Battery | Stores energy | Think of it like a water tank for electricity |
| Solar Panel | Collects sunlight | The “fuel source” of your generator |
| Charge Controller | Regulates charging | Protects your battery from overcharging |
| Inverter | Converts DC → AC | So you can use normal home appliances |
| Ports/Outlets | For plugging devices | USB, AC, DC sockets |
| Wiring + Fuse + Box | Safety + organization | Keeps everything clean and protected |
Step-by-Step: How to Build Your Solar Powered Generator (Beginner-Friendly Guide)
Let’s slow down and build this the right way — step by step, without confusion, stress, or complicated technical talk.
By the end of this walkthrough, you’ll understand exactly how every part works together, even if you’ve never touched a wire in your life.
Step 1 — Choose the Right Battery (This Is the Heart of Your Generator)
Think of the battery as your generator’s “power bank.”
Everything you store, everything you use, everything you power — all of it depends on this one component.
You have two safe choices:
Option A: LiFePO₄ Battery (Best + Safest Choice)
If your budget allows, go with LiFePO₄.
It’s the same battery chemistry used in modern solar generators like EcoFlow, Bluetti, and Anker.
Why it’s the best:
-
Lasts up to 10–15 years (thousands of cycles)
-
Much safer than older lithium chemistries
-
Lightweight and easy to carry
-
Holds power for longer
-
Perfect match for solar charging
Example size:
A 12V 100Ah LiFePO₄ battery = ~1,280Wh of energy.
What can that power?
-
LED lights for 12–20 hours
-
A phone 20–30 times
-
A laptop for 8–12 hours
-
A WiFi router for 1–2 days
-
A fan for 8–10 hours
That’s incredibly useful during blackouts or camping.
Option B: Deep Cycle Lead-Acid Battery (Budget-Friendly Choice)
If you’re trying to save money upfront, this works — just keep expectations realistic.
Pros:
-
Cheaper
-
Easy to find anywhere
Cons:
-
Heavy
-
Requires more care
-
Only lasts 1–3 years
-
Slower charging through solar
If possible, choose LiFePO₄. It’ll save you money and frustration in the long run.
Step 2 — Choose the Solar Panel (This Is the Fuel Source)
Your solar panel is the “fuel pump” that keeps your battery topped up.
Here’s what matters:
What size panel should you choose?
-
100W Panel
-
Good for phones, lights, small devices
-
Slow but steady charging
-
-
200–300W Panel
-
Much faster charging
-
Great balance for DIY setups
-
Can recharge a 100Ah battery in a day of good sun
-
Voltage & Type
-
Choose 12V or 24V panels (whichever matches your system)
-
Go with monocrystalline for better efficiency and performance
-
Make sure the panel’s open-circuit voltage (Voc) is compatible with your charge controller
Very Important
Your solar panel must align with your battery + charge controller.
If not, charging will be slow — or unsafe.
Step 3 — Install the Charge Controller (The “Brain” That Protects Everything)
The charge controller is like a guardian.
Without it, your solar panel would overcharge your battery and destroy it.
Why it’s critical:
-
Prevents overcharging
-
Prevents overheating
-
Regulates voltage automatically
-
Keeps your battery healthy long-term
How to connect it (the correct order):
1️⃣ Solar Panel → Charge Controller
2️⃣ Charge Controller → Battery
3️⃣ Then connect your load (if needed)
And remember:
❌ Never connect a solar panel directly to a battery.
This is one of the fastest ways to ruin your battery permanently.
Types of Charge Controllers
-
PWM Controller (cheap, basic, works fine for small systems)
-
MPPT Controller (best choice — 30–40% faster charging, more efficient, safer long-term)
If your budget allows even a little, choose MPPT. It dramatically improves performance.
Step 4 — Install the Inverter (So You Can Use Normal Home Appliances)
Your battery stores DC power, but your home devices require AC power.
The inverter handles that conversion.
Choosing the right size:
-
300W–500W Inverter
Perfect for lights, laptops, phones, fans. -
1000W+ Inverter
Needed for small power tools, mini fridges, or multiple devices at once.
What type should you choose?
✔ Pure sine wave inverter (BEST)
Safe for all electronics, clean power, quiet, efficient.
❌ Modified sine wave inverter (AVOID)
Causes noise, heat, and can damage sensitive electronics.
Step 5 — Add Outlets + Build Your Enclosure (Make It Practical and Safe)
This is the step where your DIY solar generator becomes a real, usable power station.
Add useful ports:
-
USB ports
-
12V DC car-style socket
-
110/220V AC outlets
-
Optional: USB-C PD
-
Optional: a digital display showing voltage, watts, battery %
Build the enclosure
Choose anything sturdy and portable:
-
Toolbox
-
Ammo can
-
Battery box
-
Plastic crate
-
Pelican-style case
Safety must-haves:
-
Good ventilation
-
A fuse or breaker between the battery and inverter
-
Neat wiring
-
Clear labels
-
Cable ties to keep everything organized
A clean setup is not just prettier — it’s safer and easier to maintain.
Pros of Building Your Own Solar Generator
- Cheaper than buying one
- You learn how everything works
- Easy to upgrade/repair
- Fully customizable
- Reliable off-grid power
Downsides (Be Honest With Yourself)
DIY solar generators lack:
- Fast AC charging
- Battery management systems
- Advanced protection
- Smart features
- Expansion capabilities
- Compact, lightweight design
If you want something powerful, portable, and safe for real emergencies, a professional solar generator is a better investment.
Compare the best here:
Best Solar Powered Generators (2026)
DIY vs Buying — Which One Should You Choose?
Choose DIY if:
- You’re on a budget
- You love hands-on projects
- You only need basic backup power
- You want to learn about solar systems
Choose Buy if:
- You want whole-home backup
- You want fast charging
- You want expandable batteries
- You want a clean, portable plug-and-play unit
Explore reader favorites:
8 Best Solar Generators in 2026
Final Thoughts (Read This Before Building)
Building a solar generator is one of the most empowering projects you’ll ever do.
Because when the lights go out…
When you’re camping…
When you’re living off-grid…
You won’t depend on anyone.
You’ll have your own mini power station — built by your own hands.
And when you’re ready to upgrade to something stronger, faster, safer, and expandable…
FAQ
Most DIY setups cost $250–$700, depending on your battery size and inverter.
Commercial generators with similar performance cost $1,000–$2,500+.
If you use LiFePO₄ batteries, your setup can last 10–15 years with proper care.
Yes — if the inverter is at least 800–1000W
To calculate runtime, use:
👉 Refrigerator Solar Power Calculator
Yes, as long as you use fuses, proper gauge wires, and a charge controller.
Avoid cheap lead-acid batteries and always insulate connections.
-
100W panel → 8–12 hours
-
200W panel → 4–6 hours
-
MPPT makes charging 20–30% faster
Minimum 1000W; for heavier appliances, go for 2000–3000W.
Or choose a professional unit:
👉 Best Solar Generator for Home Backup
